When you’re learning violin notes for beginners, finding the right note is only part of the equation.
I also want you learning how to put your fingers down correctly from the very beginning.
That distinction matters.
A beginner can technically find the right note while using too much finger pressure, holding the left hand too low, approaching the string from an inefficient angle, or creating unnecessary tension.
The note might sound right today.
But the technique you’re using to play that note can either help or hurt everything you want to play later.
That’s why we’re going to slow things down in this second part of my beginner violin series.
We’re going to learn the open strings, use fingerboard stickers as a temporary guide, establish a strong left-hand position, and then practice your first fingered notes by plucking instead of bowing.
There’s a very specific reason I teach beginners this way.
We’ll get to that shortly.
💡 What You'll Learn in This Article
- The four open violin strings and how fingered notes are created
- How fingerboard stickers can help you find your first violin notes
- Why left-hand height is one of the fundamentals I emphasize most
- How to use less finger pressure and move more efficiently
- Why I teach beginners to pluck before adding the bow
- How to start developing better intonation and pitch awareness
Start With the Four Open Violin Strings
Before putting down a single finger, learn the four open strings.
From lowest pitch to highest, they are:
G – D – A – E
These notes are called open strings because you play them without placing a left-hand finger on the string.
If you’re holding the violin in playing position, the G string is the thickest string and sits farthest to your left. Moving across the instrument, you then have D, A, and finally the thinner, higher-pitched E string.
Watch Lesson 4: Follow along as I show you how fingerboard stickers can be used to establish visual references for your first violin notes.
If your violin isn’t tuned yet, go back to Part 1 before working on finger placement.
Recommended Violin Fingerboard Stickers
There are several ways to add visual finger placement guides to your violin, and you don’t need anything fancy. Fingerboard stickers, finger tape, or small colored dots can all work well.
For beginners who want the easiest setup, I recommend Don’t Fret for 4/4 Violin. Instead of placing each marker individually, this is a one-piece guide that applies directly to the fingerboard.
I like this option because it makes it easier to get consistent visual references in the correct locations without having to measure and place every piece of tape yourself.
That said, you absolutely don’t need a full fingerboard decal.
Traditional violin finger tape is more than sufficient.
You can place individual strips across the fingerboard to create visual references for the finger positions we’re learning.
Another simple option is using small colored circle stickers. These can work well if you’d rather have a small visual target instead of a strip running across the entire fingerboard.
Whichever method you choose, remember that the markers are only temporary training tools.
The goal isn’t to stare at stickers forever.
The goal is to establish a visual reference while your hand and ear learn where the notes belong.
How Do You Play Different Notes on a Violin?
This is where violin starts behaving differently from an instrument like a piano.
There aren’t individual keys for every note.
Instead, your left-hand fingers shorten the vibrating length of the string.
Put a finger down in the correct location and the pitch becomes higher. Move the finger slightly toward the scroll and the note becomes lower. Move it slightly toward the bridge and the note becomes higher.
That means tiny differences in finger placement matter.
And unlike a guitar, a traditional violin doesn’t have frets dividing the fingerboard into exact pitches.
That’s one of the reasons intonation becomes such an important skill for violinists.
Violin Finger Numbers
Before learning specific notes, you also need to understand violin finger numbers.
Your fingers are numbered:
1 = Index finger
2 = Middle finger
3 = Ring finger
4 = Pinky
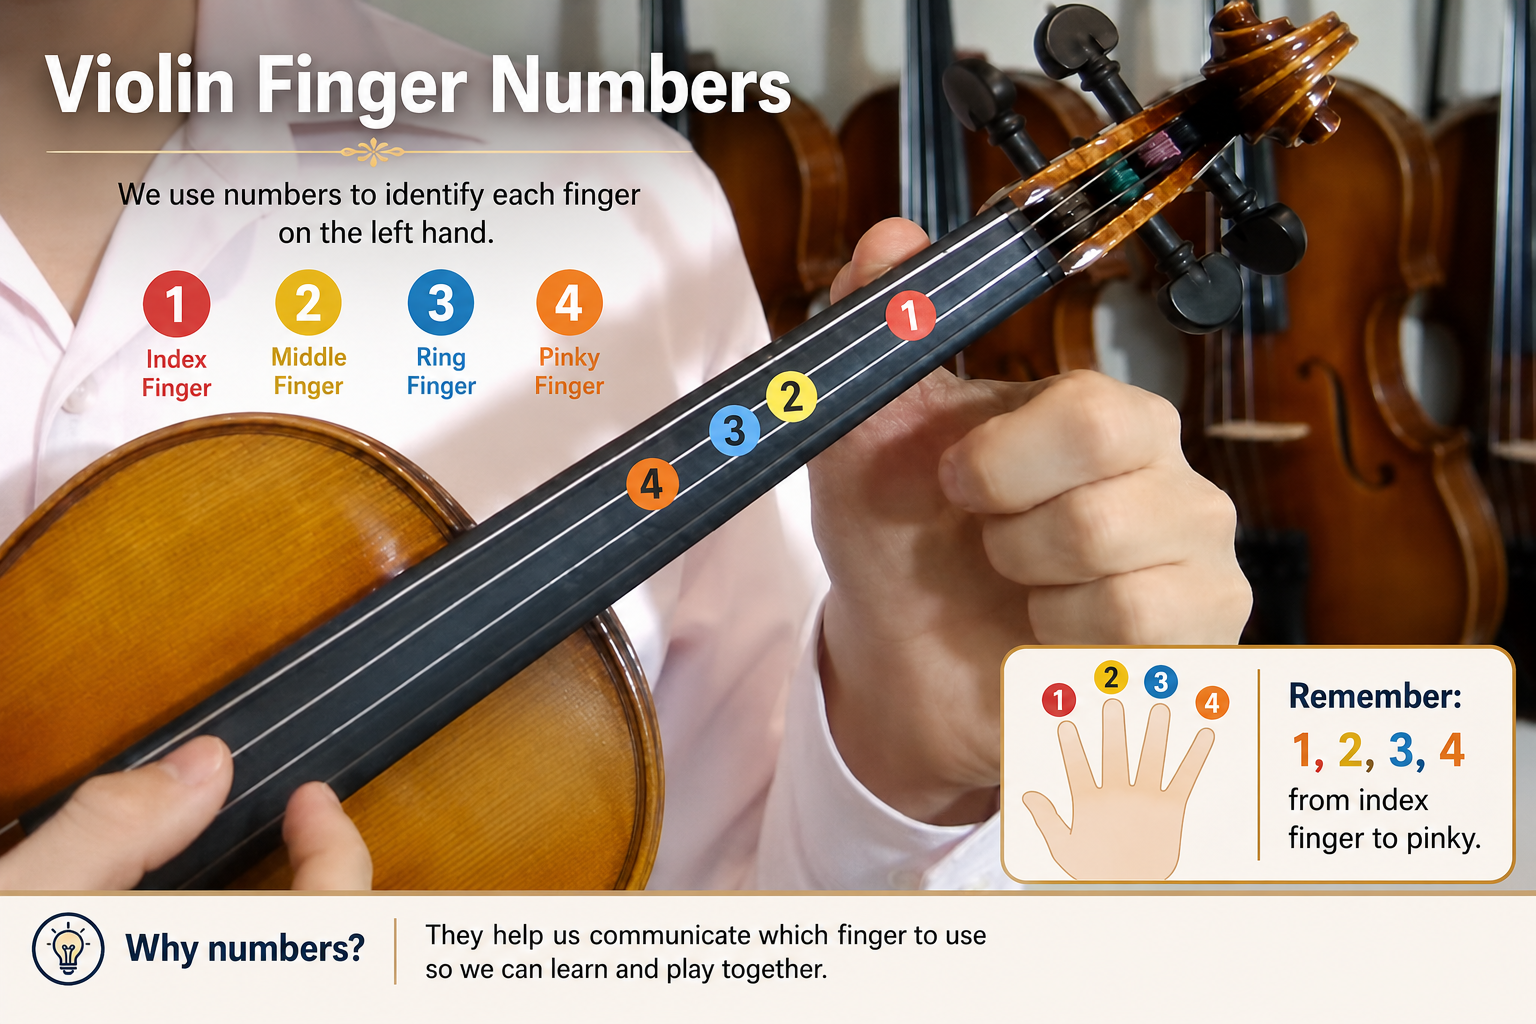
Your thumb isn’t numbered because it doesn’t play notes on the fingerboard in normal beginner technique.
So if I tell a student to play an “A1,” for example, I’m referring to using the first finger on the A string.
This language becomes much easier once you’ve used it for a little while.
Fingerboard Stickers Aren't a Substitute for Listening
This part is important.
If your finger touches a sticker, that doesn’t automatically mean you’re perfectly in tune.
Instrument setup, sticker placement, finger size, finger angle, and exactly where the fingertip contacts the string can all affect the result.
The sticker is a guide.
Your ears still matter.
A tuner can also help during this stage because it gives you another piece of feedback.
Tools should help develop awareness—not replace it. I have no problem with beginners using fingerboard stickers or a tuner. The goal is to use those tools long enough that your hand and ear begin recognizing correct placement without needing as much external feedback.
Your Left-Hand Position Matters More Than the Note
This is where I get obsessive.
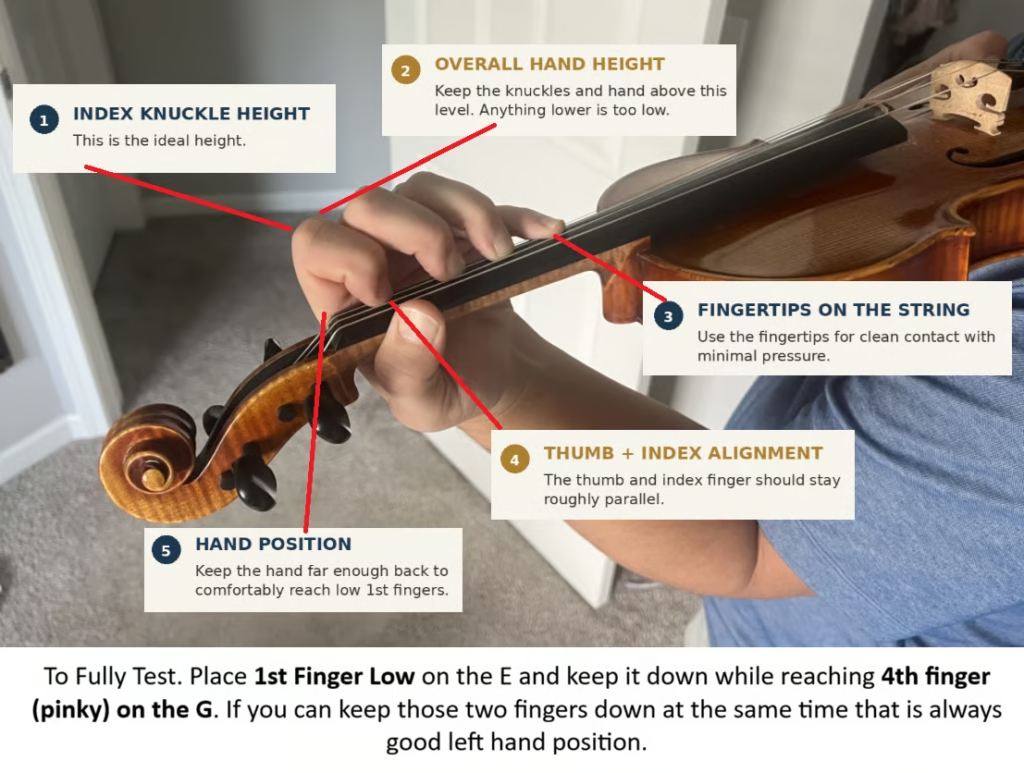
If I could correct one left-hand issue in a huge percentage of the struggling violin students I’ve taught, it would be hand height.
Watch Lesson 5: Compare your own hand position with mine. Pay particular attention to hand height and how the fingers approach the fingerboard.
A low left hand can create problems that aren’t obvious when you’re first learning violin notes.
That’s what makes it dangerous.
You may be able to put down a first finger.
You may be able to play a simple melody.
So you think:
My hand position must be fine.
But eventually, you need to reach farther.
You need the fourth finger.
You need to move efficiently between the G and E strings.
You want your fingers moving quickly.
And suddenly the position that seemed harmless during your first few weeks becomes a physical limitation.
Think About Catching a Ball Over a Fence
Here’s the analogy I use.
Imagine you’re standing behind a fence and someone is throwing balls toward you.
Your head and hands are above the fence.
Catching the balls is possible.
Now imagine someone forces your head and hands below the fence.
They can throw you 100 balls.
They can throw you 1,000 balls.
You can “practice” catching those balls every day.
Your position is still working against you.
A low left hand on violin can create the same problem.
Your fingers aren’t starting from an efficient position over the fingerboard, so reaching notes requires more effort and often creates more tension.
More repetition doesn’t solve the underlying geometry.
You have to fix the position.
Use as Little Finger Pressure as Possible
Once the hand is in a better position, the next thing I watch is finger pressure.
Beginners often press down much harder than necessary.
More pressure doesn’t make the note more correct.
It usually just creates more work.
I want the finger contacting the string close to the firmer part of the fingertip near the nail instead of collapsing onto the fleshy pad.
Finger angle matters here too.
An efficient angle makes it easier to stop the string cleanly without squeezing.
Why Finger Pressure Matters Later
You may wonder why I’m making such a big deal about this when you’re only learning your first notes.
Because I don’t teach beginner technique only for beginner music.
I’m thinking about the violinist you’re becoming.
If every finger has to press hard into the fingerboard, those fingers have to release that pressure before they can move somewhere else.
That matters when you eventually want to play quickly.
The more efficient the movement, the easier speed becomes.
This is another example of something that may not appear to matter during week one but can become a significant barrier later.
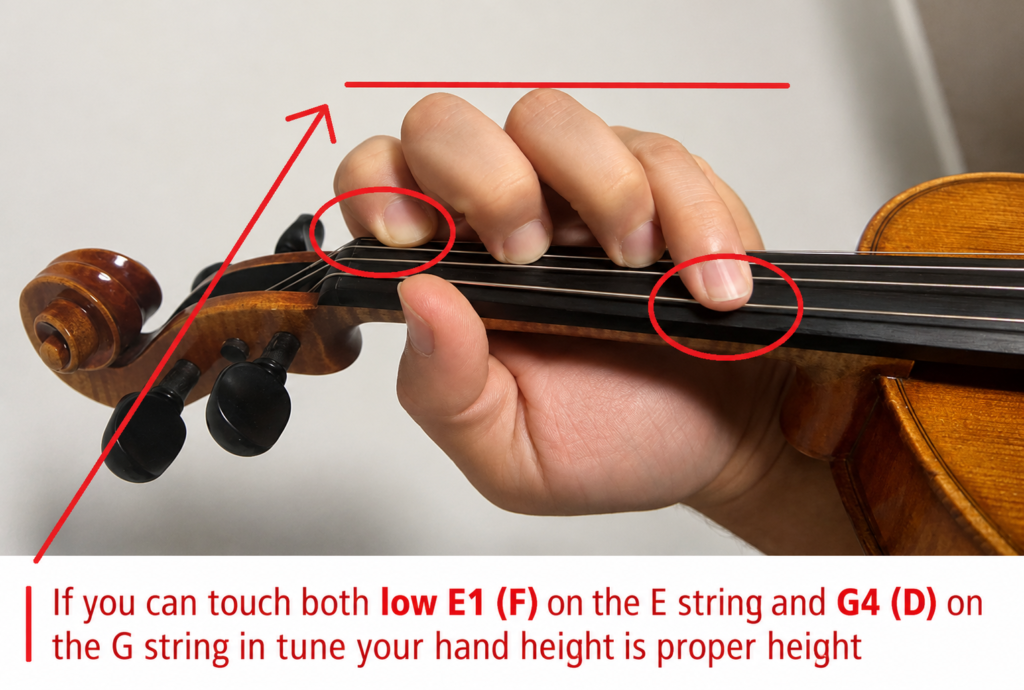
Check Your Finger Angle With My G-to-E Test
There’s another physical check I like for left-hand position.
I want the hand positioned so your fingers can comfortably reach the extremes of the fingerboard without constantly moving the entire hand around.
One test I use is seeing whether the hand can accommodate a fourth finger on the G string while also being positioned to reach a low first finger on the E string without dramatically changing the basic hand setup.
Those are two very different reaches.
If your position allows both efficiently, you’re starting from a much better place.
Place a finger on the string and play or pluck the note. Experiment with gradually reducing your finger pressure while keeping the note clear. Your goal isn't to make the finger so light that the note stops speaking. You're trying to discover how much less effort you can use while still producing a clean note. Remember the feeling.
Now Put the Bow Down
You’ve tuned your violin.
You’ve set up the fingerboard.
You’ve started thinking about hand height, finger angle, pressure, and intonation.
So naturally, you probably want to grab the bow and start playing.
I’m going to ask you not to.
At least not yet.
Instead, I want you to pluck the strings.
Watch Lesson 6: Follow along with the plucking exercise and keep your attention on the left hand rather than worrying about the bow.
Why I Teach Beginners to Pluck Before Bowing
Your left hand is trying to remember:
- Which string am I on?
- Which finger do I use?
- Where does that finger go?
- Is my hand high enough?
- Am I pressing too hard?
- Is the note in tune?
Meanwhile, your right hand is supposed to control an entirely unfamiliar bow.
Now we’re dealing with bow hold, thumb tension, index-finger control, wrist movement, elbow position, bow placement, pressure, speed, and keeping the bow straight.
That’s a lot.
Plucking removes the massive variable of bow coordination.
Now we can concentrate on the left hand.
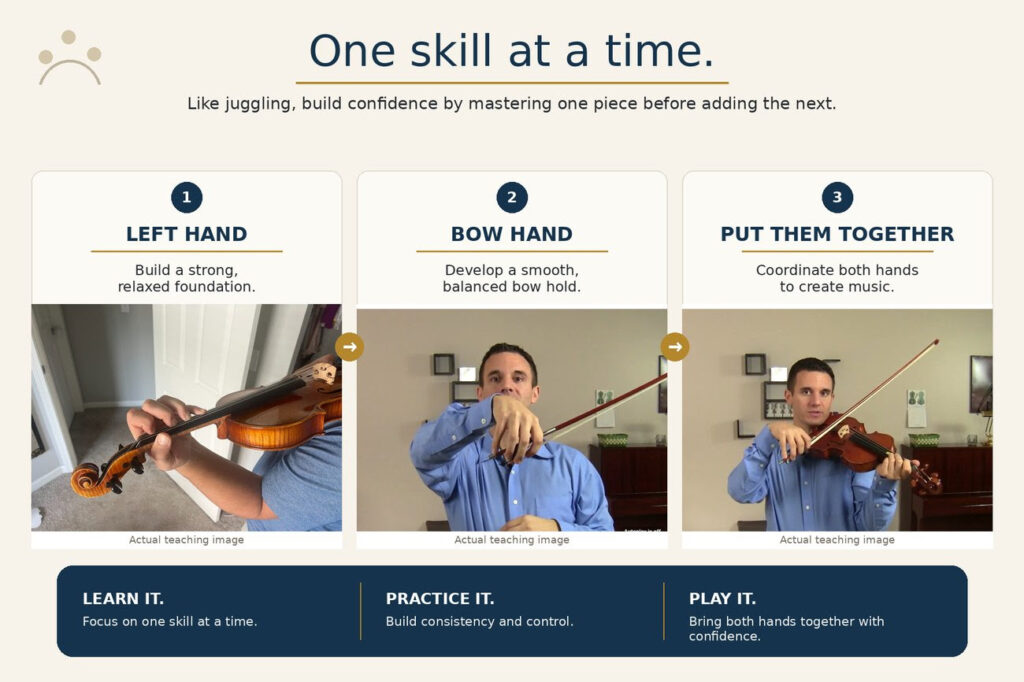
Focus on one thing at a time before asking your body to coordinate everything. I don't have a problem with practicing the bow separately either. That's actually the point. Develop the left hand. Develop the right hand. Then bring them together instead of asking a complete beginner to juggle everything on day one.
Plucking Lets You Hear Your Intonation More Clearly
There’s another benefit to temporarily removing the bow.
It simplifies what you’re listening to.
When a beginner bows a note, a poor sound could be coming from the left hand, the right hand, or both.
Was the finger in the wrong place?
Was the bow scratching?
Was there too much pressure?
Was the bow crooked?
Was the thumb tense?
That’s a lot to diagnose when you don’t have much experience yet.
Plucking removes many of those variables.
If the pitch is wrong, you can concentrate much more directly on where your finger landed.
That’s especially helpful while you’re developing intonation.
What Does Playing in Tune Actually Mean?
Good intonation means you’re placing notes accurately at the intended pitch.
The challenge on violin is that your finger can move continuously along the fingerboard.
There isn’t a fret locking it into one exact position.
That means intonation isn’t simply something you “learn” once.
You develop it.
Your stickers can provide visual feedback.
A tuner can provide objective pitch feedback.
Your ears gradually provide increasingly sophisticated feedback.
And repetition helps your hand remember where those pitches feel.
Don't Expect Perfect Intonation Immediately
I don’t expect a brand-new violinist to hear and correct every tiny pitch difference immediately.
That’s a skill we’re building.
What I do want is awareness.
Listen.
Compare.
Adjust.
Then listen again.
The dangerous habit isn’t playing one note slightly out of tune while you’re learning.
It’s playing the same out-of-tune note repeatedly without paying attention to it.
A Simple Way to Practice Your First Violin Notes
Don’t make this complicated.
Start with a small number of notes and make each repetition deliberate.
For example:
Tune your open strings.
Make sure your reference pitches are correct before beginning.
Check your posture and left-hand height.
Don’t wait until you’re halfway through practice to discover your hand has collapsed.
Pluck an open string.
Listen to the pitch (check with the tuner).
Place one finger carefully.
Think about location, angle, and light pressure.
Pluck the fingered note.
Listen.
Check the pitch against your sticker, tuner, or another reliable reference.
Then adjust if necessary.
Repeat the correct movement.
You’re not trying to accumulate repetitions.
You’re trying to accumulate good repetitions.
Quality Practice Is More Important Than Long Practice
This is one of the biggest lessons I want adult beginners to understand.
I’ve taught students who wanted to practice for hours because they were eager to improve.
There’s nothing wrong with practicing a lot.
But the number of hours isn’t what determines whether those hours are productive.
If you practice for three hours with a low hand and excessive finger pressure, you’re getting very good at playing with a low hand and excessive finger pressure.
That’s not the goal.
Practice reinforces what you repeat.
I’d rather see a beginner spend a shorter amount of time deliberately monitoring technique than mindlessly repeat notes for hours.
When Should You Add the Bow?
You don’t have to wait months.
I’ve had many adult students begin putting the two hands together within their first month.
The difference is that I don’t want day one to be an uncontrolled juggling exercise.
Spend time with the left hand.
Spend time with the bow separately.
Develop awareness of what each side is supposed to feel like.
Then combining them becomes much more manageable.
This is also why Part #3 of this series is devoted entirely to the bow.
Violin Bow Hold: Master the Basics Step by Step
We’re going to learn the bow hold, talk about one of my biggest beginner pet peeves—the banana thumb—and work through drills designed to expose tension before it becomes part of your playing.
Your Goal Isn't Just to Find the Right Notes
If you searched for a violin notes chart, you may have expected this article to simply tell you where the notes are.
I certainly want you to know that.
But a chart can’t teach you how your hand should feel.
It can’t tell you when you’re pressing too hard.
It can’t notice that your hand has dropped.
And it can’t hear the difference between a note you happened to find once and a note you can consistently play with good technique.
Knowing where a violin note is located is only the beginning.
I want you developing the physical technique and awareness that allow you to find that note reliably, efficiently, and eventually without thinking so hard about it.
That’s what gives us something useful to bring to the bow.
Got the Left Hand Down?
You’ve now started developing the left side of the equation.
You know your open strings, understand how violin finger numbers work, have a visual reference for your first notes, and are beginning to think about hand height, finger pressure, and intonation.
Most importantly, you’ve practiced those skills without simultaneously asking your brain to control a bow.
Now we’re ready for the other hand.
In Part 3: How to Hold a Violin Bow, we’ll build your bow hold, work on reducing tension, learn why I don’t want your thumb guiding the bow, and use several drills to help you develop a cleaner, more controlled stroke.
Want Feedback on What You're Learning?
Maybe you're not sure whether your left hand is high enough. Maybe your notes still sound out of tune even though you're touching the sticker. Or perhaps something simply feels uncomfortable and you can't figure out why.
Take the free LumenCorda Violin Path Assessment to help identify where you are in your violin journey and what you should focus on next.
Take the Free AssessmentFrequently Asked Questions About Violin Notes for Beginners
What are the four violin strings?
The four open violin strings from lowest to highest are G, D, A, and E. These are called open strings because you don't place a left-hand finger down to produce them. Your other first-position violin notes are created by placing fingers at different locations along those strings.
What are the finger numbers on violin?
Violinists generally number the left-hand fingers from 1 through 4. The index finger is 1, middle finger is 2, ring finger is 3, and pinky is 4. The thumb isn't assigned a playing number because its job in normal beginner technique is to support the hand rather than press notes onto the fingerboard.
Should beginner violinists use fingerboard stickers?
I think fingerboard stickers can be a very useful beginner tool. They provide a visual reference at a stage when your ear and muscle memory are still developing. I've seen students use them for roughly three or four months and then become aware enough of their intonation to begin taking them off. The important thing is to continue listening instead of assuming that touching a sticker automatically makes every note correct.
How do I know if a violin note is in tune?
At first, use multiple forms of feedback. Listen carefully, use your fingerboard markers as a location reference, and check yourself with a tuner when helpful. Over time, I want you to hear that a note is slightly sharp or flat and make a small adjustment yourself. That ability develops through attentive listening and repetition—it doesn't have to be perfect during your first week.
How hard should I press violin strings?
Use only enough pressure to stop the string cleanly. One of the common problems I see is beginners pressing far harder than necessary. That creates tension and makes the fingers less efficient. I want the finger approaching from a good angle and contacting the string near the firmer portion of the fingertip. As your technique improves, light and efficient finger pressure becomes increasingly important for speed.
Why is my left hand so tense when I play violin?
Check your hand height, finger angle, finger pressure, and whether you're squeezing. A low hand can force your fingers to reach from an inefficient position, which encourages more tension. That's why simply telling someone to "relax" isn't always enough. Sometimes you have to correct the physical position that's causing the tension.
Why should I pluck the violin before using the bow?
I use plucking to remove a huge coordination variable. Your left hand already has plenty to learn: note locations, hand position, finger angles, pressure, and intonation. Adding bow technique immediately means your brain is trying to manage an entirely different collection of right-hand skills at the same time. It's like learning to juggle. I don't need to hand you four balls on day one.
When should a beginner start using the bow?
It can happen relatively quickly. I've had many adult beginners putting both hands together within their first month when they've practiced the left and right sides individually. I'm not trying to delay the bow. I'm trying to make sure you have some idea what each hand is supposed to do before asking them to work together.
Do I need to memorize every violin note?
Not at the beginning. Start by learning the open strings, your basic finger numbers, and a manageable group of first-position notes. As you repeatedly play, read, hear, and locate those notes, recognition becomes increasingly automatic. The goal isn't to stare at a giant chart and memorize the entire fingerboard before you play anything. Learn the instrument progressively.
Michael Sanchez
Michael Sanchez is the founder of Lumen Corda, author of Fiddle For Dummies, and a violin educator with more than 25 years of teaching experience. He has helped hundreds of students develop stronger technique, greater confidence, and a deeper understanding of the violin. His teaching philosophy is simple: understanding creates better technique.
More About Michael