A good violin bow hold should feel much lighter and more relaxed than most beginners expect.
That’s important because one of the biggest mistakes I see is exactly the opposite.
Beginners grab the bow.
They squeeze it.
They press upward with the thumb.
They try to physically steer the bow using the strongest parts of the hand.
Then they wonder why the sound feels scratchy, stiff, bouncy, or difficult to control.
The bow doesn’t need to be wrestled into submission.
A good bow hold gives the bow enough support to remain stable while allowing your fingers, wrist, and forearm to move freely.
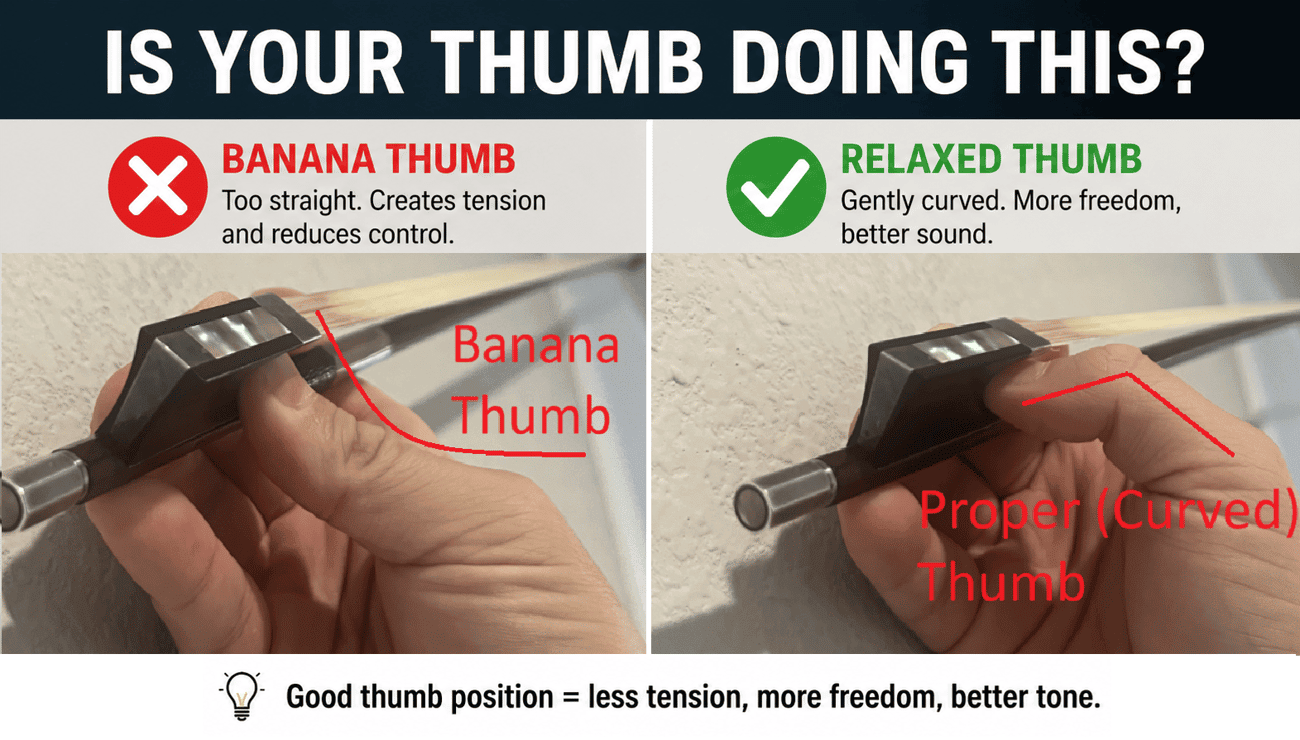
And if I had to identify one right-hand habit that causes more problems than almost anything else, it would be what I call the banana thumb.
We’re going to fix that first.
💡 What You'll Learn in This Article
- How to build a relaxed violin bow hold
- Why the thumb should not guide the bow
- How the index finger helps control the stroke
- How to recognize and reduce right-hand tension
- How tight your violin bow should be
- How rocking-bow and index drills expose bad habits
- How to rosin the bow before you begin playing
The Biggest Violin Bow Hold Mistake: The Banana Thumb
When beginners pick up the bow, they naturally want to hold it securely.
That makes sense.
The problem is that “securely” often turns into squeezing.
The thumb pushes upward against the bow, stiffens, and begins acting like the finger responsible for controlling everything.
I call this a banana thumb.
It creates tension throughout the hand and makes the bow much harder to control fluidly.
Your Violin Is Already Holding the Bow
One of the most useful things for beginners to understand is the physics of what’s happening.
When the bow is resting on the violin string, the violin itself is supporting the bow.
You don’t have to hold the bow up.
That changes the job of your thumb.
Your thumb does not need to push aggressively upward to support the weight of the bow.
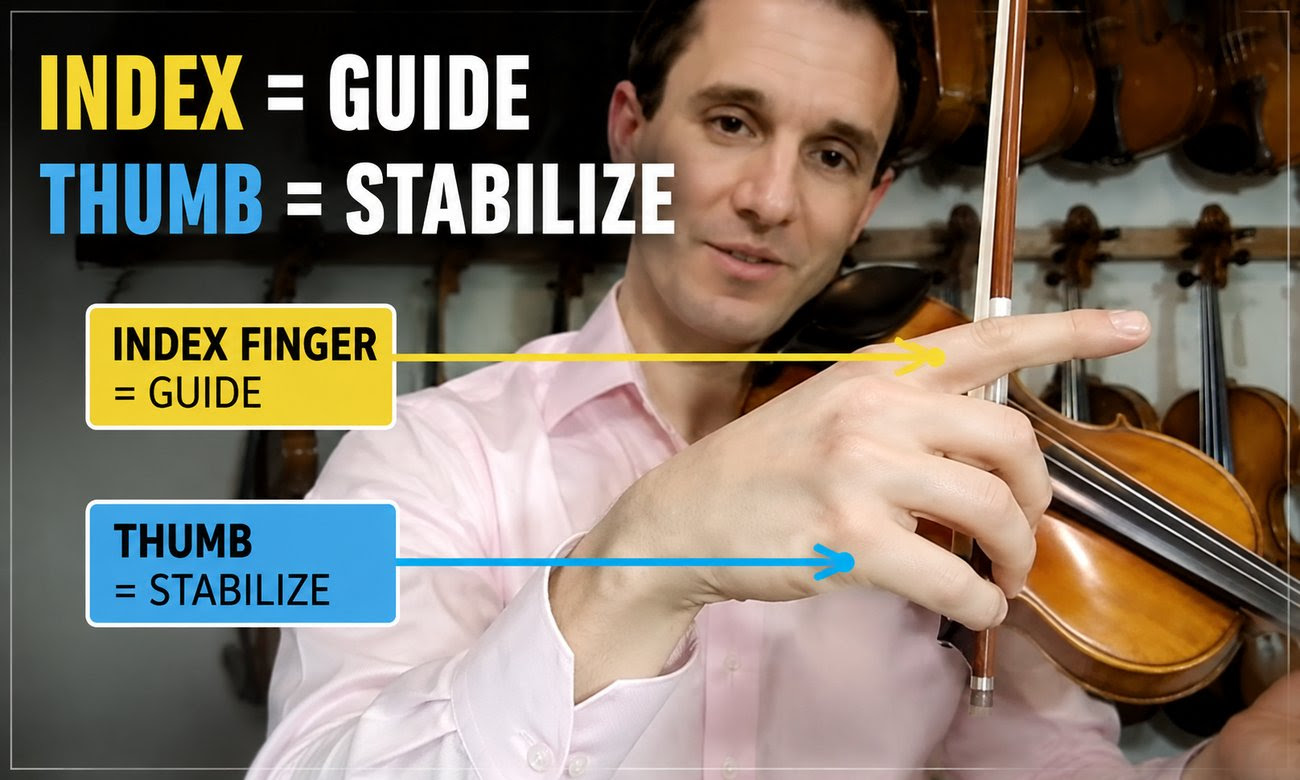
In my teaching, I think of the thumb mainly as helping keep the bow stable and preventing it from wobbling away.
I do not want the thumb steering the bow.
That’s the job beginners often give it because the thumb is strong.
But stronger isn’t better here.
The bow needs freedom.
The thumb stabilizes the bow. It should not control the bow. When the thumb starts pressing and guiding, tension spreads through the entire right hand. I want the hand relaxed enough that the index finger can become the main conductor of the stroke.
Let the Index Finger Guide the Bow
If the thumb isn’t supposed to guide the bow, what does?
For me, the index finger is incredibly important.
The index finger sits on top of the bow and gives us a much more efficient place to influence the stroke.
Watch Lesson 7: Focus on how I build the right-hand position and how the fingers support the bow without squeezing it.
Think about the mechanics.
The violin is underneath the bow.
The index finger is above it.
That means the index finger can naturally influence how the bow interacts with the string without requiring the hand to squeeze from below.
This is one reason I spend time getting beginners to understand the relationship between the index finger and thumb before worrying about playing songs.
Why I Use Bow Drills Before Songs
Beginners are understandably eager to play music.
I am too.
But drills have a major advantage:
They expose weaknesses.
A song asks you to think about notes, rhythm, left-hand placement, bow direction, and musical timing all at once.
A drill removes much of that noise.
Now we can look at one movement.
We can hear one problem.
We can identify one source of tension.
That’s extremely valuable.
I don’t use drills because I want students doing boring exercises forever.
I use drills so the bad habits have nowhere to hide.
The Index Drill: Learn to Feel the Right Finger
One of my early bow exercises is an index-finger drill.
The purpose isn’t simply to move the bow.
I want the student becoming aware of where control should come from.
If your thumb is doing all the work, an isolated drill can make that obvious.
If your hand is squeezing, the drill can expose that too.
Watch Lesson 8: Use this drill to feel how the index finger can influence the bow while the thumb remains relaxed.
Perform the index drill slowly. Every few seconds, stop and ask: Is the thumb pressing? Did the thumb straighten or lock? Does the hand feel like it's gripping the bow? Can I reduce the effort without losing control? The goal isn't simply to finish the drill. The goal is to notice what your hand is doing.
The Rocking Bow Drill: Let Tension Reveal Itself
This is one of my favorite beginner drills because the sound gives you feedback immediately.
Watch Lesson 9: Listen for scratchiness during the rocking motion. Treat that sound as feedback that may indicate excess tension.
The rocking bow drill asks you to move the bow across the strings in a controlled way.
If the hand is overly tense, you often hear it.
The bow scratches.
The movement feels jerky.
The hand wants to squeeze.
That’s useful information.
If the drill exposes a bad sound, it has exposed something we can work on.
A good drill makes the problem obvious. When a student hears scratching during the rocking bow drill, they don't need me to give them a philosophical lecture about tension. They can hear the result themselves. That awareness is the beginning of correcting it.
Why Awareness Matters More Than Perfect Bowing
When I teach beginners privately, I’m making adjustments constantly.
Relax the thumb.
Move the index finger.
Soften the hand.
Adjust the wrist.
Use less arm.
Extend the forearm.
At first, the student usually doesn’t notice all of those things.
That’s normal.
You’ve never had to coordinate these movements before.
But eventually, I want you catching them yourself.
That’s when technique begins becoming yours instead of something your teacher has to constantly remind you about.
This is one reason I emphasize drills so much.
They create a controlled environment where awareness can develop before the technique gets buried inside a song.
How Tight Should a Violin Bow Be?
Bow tightness is another beginner question that seems simple but matters a lot.
Your bow hair needs enough tension that you can play effectively, but tightening the bow excessively makes it rigid and can negatively affect how it responds.
The goal isn’t to crank the screw until the hair feels as tight as possible.
You want usable tension while preserving the natural curve and flexibility of the bow.
Watch Lesson 10: Use this demonstration to see how I judge an appropriate amount of bow-hair tension before playing.
Don't Forget to Loosen the Bow When You're Done
This should become part of your routine.
Tighten the bow before practicing.
Loosen it afterward.
Leaving the bow under playing tension when you’re finished isn’t a good storage habit.
Eventually, these little setup routines become automatic.
That’s exactly what we want.
Why Put Stickers on the Bow?
We used fingerboard stickers in Part 2 to create visual references for the left hand.
We can do something similar with the bow.
A beginner doesn’t automatically understand how much bow they’re using or where along the bow a particular movement is happening.
Bow stickers give us reference points.
Now instead of vaguely telling someone to “use more bow,” we can give them something visible.
Watch Lesson 11: See how visual markers on the bow can help you understand bow distribution and where your stroke is happening.
Why Bow Distribution Matters
Beginners often use a very small portion of the bow.
It feels safer.
Smaller movements can seem easier to control.
But one of the fundamentals we’re eventually building is the ability to use different amounts of bow intentionally.
Longer strokes.
Shorter strokes.
Different regions of the bow.
Different speeds.
The sticker isn’t the technique.
It’s simply helping you see the movement more clearly.
How to Rosin a Violin Bow
Before a bow can grip the string properly, the hair needs rosin.
Without enough rosin, the bow can slide across the string without producing a strong, consistent sound.
Too much rosin can create its own problems.
Like almost everything else we’re doing, the goal isn’t more.
The goal is enough.
Watch Lesson 12: Follow the demonstration to learn how I prepare the bow hair with rosin before playing.
🎻 My Recommended Rosin: Jade Rosin
If you’re looking for a good, reliable rosin, Jade Rosin is the one I recommend. It provides a nice grip on the strings without feeling overly sticky, and it works well for violinists at just about any level.
It’s also easy to apply, lasts a long time, and is a great choice if you simply want a quality rosin without overthinking it.
The Bow Hold Should Stay Flexible While You Play
One of the biggest misconceptions beginners develop is that getting the bow hold “correct” means freezing the hand in a perfect-looking shape.
That’s not what I want.
The hand has to move.
The fingers have to respond.
The wrist needs freedom.
The bow travels through different parts of the stroke, and the hand needs to adapt without losing its basic structure.
Good technique is stable without becoming rigid.
This is why tension is so destructive.
Once the thumb locks and the fingers squeeze, the hand loses the flexibility we’re going to need for a natural stroke.
Your Arm Shouldn't Do All the Work
Another problem I see is beginners trying to control the entire stroke from the upper arm.
This creates tension and limits the natural extension of the bow.
As we move into the next part of this series, I’m going to show you what I call the four-part stroke.
One of the reasons I teach it is to help students understand how the forearm extends and releases instead of forcing the entire movement from the upper arm.
For now, notice the same principle showing up again.
We’re not trying to overpower the violin.
We’re trying to create efficient movement.
Why Bowing Can Sound Scratchy, Squeaky, or Bouncy
Beginners often assume an ugly sound means they’re simply “bad at violin.”
Usually, there’s a physical reason.
The bow may be too tense.
Your thumb may be pushing.
Your hand may be squeezing.
Your wrist may be stiff.
Your index finger may not be managing the bow effectively.
Your arm movement may be inefficient.
That’s why I don’t want you just repeating the sound and hoping it improves.
Diagnose what created it.
This is the same philosophy we used with the left hand.
When a note is out of tune, we ask why.
When the bow scratches, we ask why.
Good practice isn’t simply repetition.
It’s observation followed by correction.
Quality Practice for the Bow
You don’t need to spend hours playing songs to improve your bow.
In fact, during the early stages, you may make more progress spending a portion of your practice time on very simple bow exercises.
Try this sequence:
- Check your bow tension.
Prepare the bow before putting it on the string.
- Check your thumb.
Make sure you’re not creating the banana-thumb grip.
- Set the bow on the string.
Remember that the violin is already supporting it.
- Perform the index drill.
Focus on where control is coming from.
- Perform the rocking bow drill.
Listen for scratchiness and notice tension.
- Use your bow markers.
Pay attention to how much bow you’re actually using.
- Stop when something feels wrong.
Correct the movement before repeating it.
That last step matters.
Don’t practice the mistake five more times just because you’re already moving.
During your next practice session, stop with the bow resting on the string. Without changing the bow's position, ask yourself: Can I soften my thumb? Can I release my fingers slightly? Can the bow remain stable with less effort? Does my wrist feel free to move? You may be surprised by how much effort you can remove while still controlling the bow.
Relaxation Doesn't Mean Losing Control
Sometimes students hear the word “relax” and assume I’m asking them to make the hand floppy.
I’m not.
We still need structure.
We still need control.
The bow shouldn’t wobble out of your hand.
What we’re removing is unnecessary force.
There’s a big difference between:
stable
and
tight.
Good bow technique gives you stability without rigidity.
When Is Your Bow Hand Ready to Play Songs?
I’m not looking for perfection.
I don’t expect a brand-new violinist to master the bow before combining it with the left hand.
But I want some fundamental awareness first.
You should understand what a relaxed thumb feels like.
You should know that the index finger has an important role in controlling the bow.
You should have experienced the rocking bow drill and recognize what tension can sound like.
You should understand basic bow tightness and rosin.
And you should have spent some time moving the bow independently of the left hand.
At that point, we have something we can combine with the left-hand foundation from Part 2.
That’s where the fun really starts.
If you haven’t completed Violin Notes for Beginners, work through that lesson before putting everything together.
Next Lesson: Put Both Hands Together
We’ve now separated the two major physical systems of violin playing.

In Part 2, you developed your left hand and practiced notes through plucking.
In this article, you’ve started developing the bow independently.
Now we’re ready to combine them.
In Part 4: How to Play Violin, we’ll work through the bow stroke itself, learn my four-part stroke, bring both hands together, and finally use these fundamentals to play your first song.
Not sure what to work on next?
Every violinist's journey is different. Take the Find Your Violin Path Assessment for personalized guidance.
Take the Free AssessmentFrequently Asked Questions About Violin Bow Hold
How do you hold a violin bow correctly?
A good violin bow hold should be secure enough to stabilize the bow but relaxed enough for the fingers and wrist to move freely. One of the biggest things I emphasize is avoiding upward pressure with the thumb. I want the thumb supporting and stabilizing rather than steering the bow. The index finger then becomes much more useful for influencing the stroke from above.
Should your thumb be bent when holding a violin bow?
I want the thumb relaxed rather than locked into a stiff, pushing position. The exact shape can change slightly as the hand moves, but what I don't want is the exaggerated tense position I call the banana thumb. If the thumb feels like it's pushing hard upward against the bow, that's a sign to stop and reassess the hand.
Why does my bow hand hurt?
Pain isn't something I'd encourage you to simply play through. A bow hand that feels tired or strained may be squeezing too hard, pressing with the thumb, locking the wrist, or using more effort than necessary. Check your setup and reduce tension. If you're experiencing persistent pain rather than normal beginner fatigue or unfamiliarity, stop and get qualified in-person guidance rather than forcing the motion.
Why does my violin bow sound scratchy?
Scratchiness can come from multiple factors, but tension is one of the first things I look for with a beginner. A tight thumb, rigid wrist, excessive pressure, inefficient bow movement, or lack of control can all contribute. That's why I like the rocking bow drill. It isolates the movement and can make tension much easier to hear.
Why does my violin bow bounce?
Beginners often create bow bounce through stiffness or excessive tension. When the hand, wrist, and arm are rigid, they don't absorb and guide the natural movement of the bow as effectively. Instead of trying to force the bow harder into the string, I usually want to look for where we can remove tension and improve control.
How tight should a violin bow be?
The bow hair needs enough tension to play effectively while the stick still retains its natural curve. I don't want beginners tightening the bow excessively. Watch the bow-tightness lesson above and use that visual reference while you're learning what an appropriately prepared bow looks like.
How often should you rosin a violin bow?
There isn't one perfect schedule for every player and bow. What matters is whether the bow hair has enough rosin to grip the string and produce a consistent sound without excessive buildup. Beginners sometimes assume more rosin is always better, but like finger pressure and bow tension, the principle is usually to use enough rather than as much as possible.
Why does my thumb keep getting tense?
Because the thumb is strong and your brain naturally wants to use it to control the bow. That's one reason I talk about the physics of the bow resting on the violin. Once you understand that the thumb doesn't need to hold the bow up or steer it, it becomes easier to start changing that habit. The index drill and rocking bow drill are particularly useful because they give you a chance to monitor the thumb without worrying about playing a song.
Should beginners practice bowing without the left hand?
Yes—that's a major part of my approach. In Part 2, I isolated the left hand by having you pluck. Here we're doing the opposite: developing the bow without asking you to simultaneously find notes with your left hand. You don't have to keep the hands separated forever. We're simply reducing the variables until each side has a basic foundation.
Michael Sanchez
Michael Sanchez is the author of Fiddle For Dummies and has more than 25 years of violin teaching experience. His teaching emphasizes strong fundamentals, efficient technique, awareness, and helping students remove unnecessary tension so technical movements can become freer and more natural.
More About Michael